Photography equipment is an essential part of making great photos.
While some of us spend more time obsessing over gear than others…there are certain pieces of photography equipment you’re going to need to get started.
Whether you’re a beginner looking to start this great hobby or an experienced photographer that is looking to upgrade their kit, this breakdown of essential equipment for photographers will help you out.

I’ve categorized it into these categories for you:
Let’s start with the most basic (and obvious) piece of gear you’ll need…
Photography Goals uses affiliate links. When you buy products through the links on our site, we may earn a commission.
1. Camera
If you’re reading this, you might already have a camera. If you do…awesome. Skip to #2 because you can make great photos with any camera. But if you’re just getting started or currently shooting with your smartphone, here are some tips that will help.
If you plan on making photography a regular hobby, then getting a camera that can change lenses is extremely helpful. That doesn’t mean that fixed lens cameras are bad, but it is worth the added investment for an interchangeable lens camera if you can afford it.
I’ll get more into lens selection in the next section.
As far as camera type…mirrorless cameras are the way to go now. Manufacturers are moving away from DSLRs and putting all their best new technology into the mirrorless lineups. Nikon announced in 2022 that they would not be making any more new DSLRs.
But if you already have one, they are still great cameras. You don’t have to upgrade right away. Just be aware of this if you’re thinking about investing in any new lenses.
When you buy a camera, you are buying more than just the camera itself, you are buying into a camera system that includes a whole lot of lenses and compatible accessories. So it is important to select a good system.
We usually refer to camera systems by the camera mount that the lenses fit on because you can interchange the cameras and lenses so long as they all have the same mount. So you can have a few
In my opinion, the best system out there is the Nikon Z Mount lineup. Here are my two favorites, depending on whether you want a less expensive model or a more “pro” quality camera.
Beginner Pick | Nikon Z50
The Nikon Z50 is a medium-sized crop sensor mirrorless SLR camera that is part of the Nikon Z mount system. It is my top pick as the best Nikon camera for beginners.

Nikon Z50
The Nikon Z50 is an excellent entry point into the Nikon Z Mount system. It has professional-level image quality with a 20.9 MP crop sensor as well as full manual control and excellent video capabilities up to 4k. This camera works with all Z mount lenses.
I am often asked why beginners should not get a more advanced camera right away if they have the budget for it. The main reason is that with higher end cameras comes more complexity. I’ve found that my students learn the fundamentals much better with a more simple camera. Then the transition to a more pro level camera is much easier.
Advanced Pick | Nikon Z6II
The Nikon Z6II is a full-frame mirrorless SLR camera in the Nikon Z Mount system and one that I would consider the best all-around camera on the market today.

Nikon Z6II
The Nikon Z6II is a pro-level camera and can do just about anything. It has a 24.5 MP sensor that can shoot 14 frames per second and is among the best full-frame camera’s on the market for low light and dynamic range performance. It also has excellent video specs. It works with all of the Z mount full-frame lenses.
With excellent image quality and low light performance combined with good shooting speed, you can use this camera for everything from portraits, to action sports, and even landscapes.
2. Lenses
The lens has more impact on the appearance of your image than anything else.
In fact, having a good quality lens on a less expensive camera will give you far better results than having the best camera possible with a low-quality lens.
If you are looking for a Nikon Lens, I created a detailed guide for you on all of the best Nikon lenses.
There are two types of lenses you can consider when looking to add another lens to your kit or when choosing your first lens, prime lenses, or zoom lenses.

Prime Lenses
Prime lenses are set at a single focal length (such as 50mm, 85mm, etc.).
The benefits to using a prime lens are that they are generally sharper, less expensive, and have wider maximum apertures compared to comparable zoom lenses.
The only real drawback to using a prime lens is that you have to change the lens if you’ll like to change the focal length. This can slow you down in situations where timing is important to get the shot such as events, sports, or wildlife.
Zoom Lenses
Zoom Lenses allow you to change the focal length of a lens without changing it. Some popular zoom lenses are the 24-70mm and the 70-200mm lenses.
The biggest benefit of the zoom lens is that you can change the look of your photo without having to change the lens. For example, with a 24-70mm lens you could easily shoot a wide angle landscape photo at 24mm and a portrait shot at 70mm.
Maximum Aperture
In addition to the focal length, another consideration when choosing a lens is the maximum aperture. Many kit lenses that come with the camera will have a variable max aperture of something like f/4-5.6. While these lenses are inexpensive and may seem appealing to beginners, the smaller max aperture makes it difficult to achieve shots with a shallow depth of field.
If you’re just getting started, I would recommend a 50mm f/1.8 lens. This is often the least expensive lens in any camera system’s lineup and can be quite versatile.
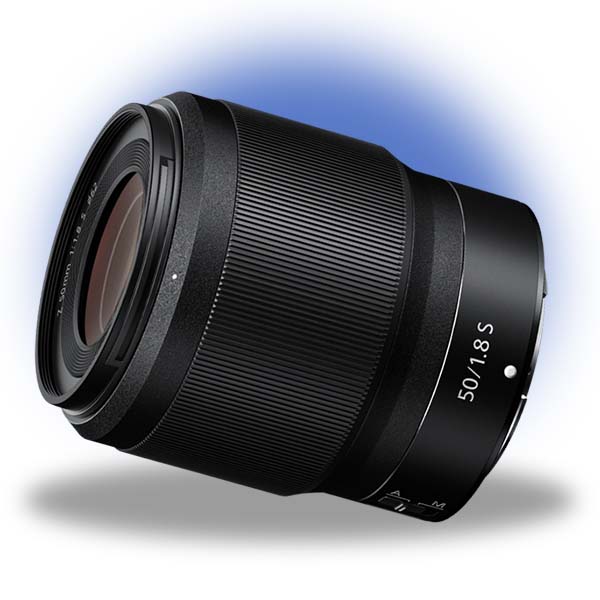
Nikon | Z 50mm f/1.8
The Nikon 50mm f/1.8 is an excellent starting lens for the Nikon Z system and a great addition to any photographer’s bag. The wide f/1.8 aperture and versatile 50mm focal length will open up a wide range of photography opportunities.
After that, you can add a lens that is more tailored to the kind of photography you shoot most often, such as a wide angle lens for landscapes or a telephoto zoom for sports or wildlife.
3. Tripod
Once you have a camera and lens, the third of the absolute necessities you’ll want to get is a tripod.
Whether you are shooting landscapes or portraits, having a tripod unlocks many different types of shots that you can’t get without one. The ability to lock down your camera on a stable base allows you to get shots that require longer shutter speeds without having to worry about holding your hands steady.
The major considerations when it comes to choosing a tripod are stability, weight, size, and cost. Tripod range from the cheap $40 versions you see in electronics stores to high-end carbon fiber landscape tripods that cost over $1000 dollars.
Avoid the cheap ones at all costs. They barely work even when you first get them and one hike will render it completely useless. Save up at least $100 to get a tripod that will last a long time. I invested in a good tripod 8 years ago and I’m still using it on a regular basis.
Of the current models out there, Three-Legged Thing makes some of the best tripods. As long as you have the budget to spend on them.

Three Legged Thing | Mike
The Mike model from Three Legged Thing is on par with the top tripods on the market. It’s a 3-section carbon fibre with great stability and a light weight of only 3.64 lbs. It also has a leveling head and can get almost to the ground for great low level landscape shots.
There are more expensive tripods, like the well known Really Right Stuff, but I’ve found those to be somewhat overpriced for the average photographer. However, if you spend a lot of time outdoors in harsh conditions, they are certainly worth the investment.
As for more budget-friendly tripods, I think the options from K&F Concepts provide decent quality for a low cost. The small size and lightweight of this tripod also make it great for traveling.
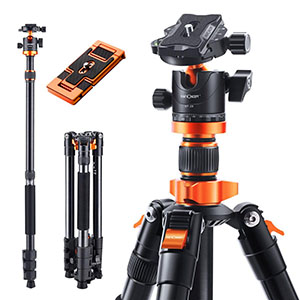
K&F Concepts | SA254M1
The K&F Concepts tripods are the best of the budget tripods. In addition to decent quality for the price, you get some nice features like a compatible phone holder, a detachable leg to use as a monopod, and a ballhead included.
With low cost tripods, you have to accept that they are going to be less sturdy and have a limited lifespan, but it’s better to have one and then upgrade later than to not have one at all.
4. Polarizing Filter
Once you have the big three above, the very next thing you want to get is a good set of lens filters. Being able to control the light conditions will help you take better quality photos and even get shots that you never could have gotten without the filters.
There are two types of filters you should have, polarizing filters and ND filters.
Polarizing filters will help to remove glare and reflections from your image. They work basically the same as polarized sunglasses.
By decreasing the bright reflections and glare off of things like water or leaves, you’ll get better-quality images with richer and deeper colors.
5. ND Filters
ND Filters cut down the amount of light entering your camera. This will allow you to have greater control over your exposure.
One of the most common uses of an ND filter is to darken the image so that you can use a longer shutter speed to get proper exposure. Shooting long-exposure images like this let you show motion blur in things like clouds, water, cars, or anything else that moves.
When choosing a set of filters, I look for image quality and ease of use. If you employ any type of filters in your photography, you’ll be taking them on and off often, so if they are not easy to put on or remove, it can have a negative effect on your ability to get the shot.
I’ve been using the Kase Wolverine magnetic filters for the last couple of years and they have been great. They have exceptionally high image quality and the magnetic mount makes them extremely fast and easy to use.

Kase Wolverine Magnetic Filter System
The Kase Wolverine Filters are among the industry’s best as far as image quality and the magnetic mounting system makes them extremely easy to use.
The only downside of the Kase Wolverine filters is the cost. You definitely get what you pay for but their kit isn’t cheap. So if budget is a concern, try the filters from K&F Concepts.
6. L-Bracket
A good L-bracket is inexpensive and almost as important as having a tripod for many types of photography.
It is basically an L-shaped mount for your camera that will fit into your tripod in either landscape or portrait orientation. The benefit of this is that it allows you to easily change the orientation of your camera in a tripod without making any adjustments to the tripod setup.
This may not seem like a big deal but if you shoot landscapes it can save a lot of time and help you get multiple looks of the same shot quickly and easily.

Three Legged Thing | Ellie
The Ellie L-bracket from Three Legged Thing is simple, solid, and the bright orange color adds a little style to separate your camera from the rest (or you can get the black version).
My favorite L-bracket is the Three-Legged Thing Ellie. It fits a number of differnet cameras so you won’t have to get a new one if you change cameras down the line.
7. Memory Cards
There are two kinds of memory cards that you are likely to need for your digital camera.
SD Cards
SD Cards are the most common type of memory cards and probably the type you are familiar with.
I recommend the SanDisk Extreme Pro. In fact, given the small price difference between these and the less expensive model from SanDisk, don’t even consider getting another model. Go with the Extreme Pro. These are the fastest cards on the market and are made to high tolerance standards that make failures rare.
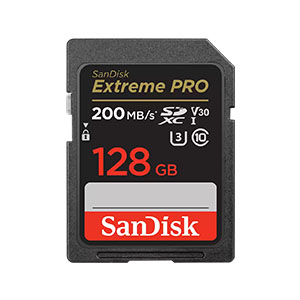
SanDisk | Extreme Pro SD Card
The Extreme Pro SD cards from SanDisk are the best and most reliable cards on the market. These are the only cards I ever use.
CFexpress
Some modern cameras use a newer type of card called CFexpress. They are considerably faster and much more rugged and stable. However, they cost a lot more. The top cameras on the market, like the Nikon Z9, use this type of card.
For these, I would also recommend going with the SanDisk Extreme Pro CFexpress cards. SanDisk has a great track record of reliability.
8. Extra Batteries
One of the biggest downsides to mirrorless cameras is that they use more battery than a DSLR because. So you’ll need some extra batteries.
I would recommend having at least 2 extra batteries if you plan to shoot for long periods of time. I also always keep a battery pack in my camera bag to plug into your camera or charge your batteries.
There are a lot of 3rd party batteries on the market, but you’ll generally get the best value for your money by buying the batteries from the camera manufacturer. 3rd party batteries are cheaper but they often don’t last as long and have a shorter lifespan.
9. Camera Bag
A camera bag is one of those things you never realize the importance of until you don’t have one with you.
A good camera bag is going to hold all the gear that you use on a regular basis and maybe still have some extra space for things you use only for certain types of shots (like a flash, for example).
It should also be durable and stiff enough to protect your gear from minor impacts like drops or bumping into things. This is why I don’t really recommend using a regular bag or backpack to carry your camera unless you add some kind of padding to it. Everyday bags just do not protect a camera well enough.
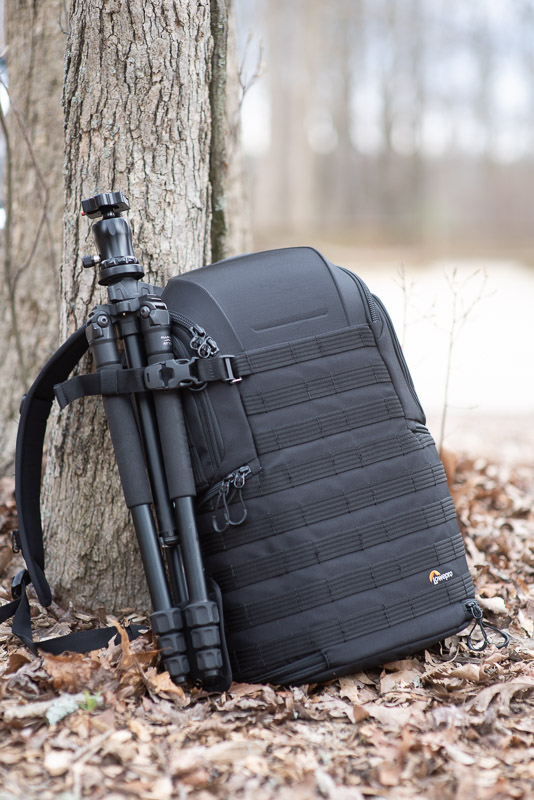
The bag I recommend and use is the backpack-style Lowepro ProTactic 350 AW II. It’s waterproof, has tons of storage, a stiffer shell without being hard plastic, lets you attach things like a tripod to the outside, is comfortable to wear, and has a hip strap to take some weight off your shoulders on long hikes.
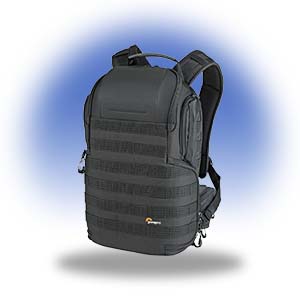
LowePro | ProTactic 350 AW II
The ProTactic 350 AW II is the newest version of the excellent ProTactic line from LowePro. It works excellently whether you are taking all your gear to a portrait shoot or packing light for a landscape photo hike.
My favorite feature is that it opens from the side that is against your back. That means with you put it down to open it, the part you wear isn’t on the ground. This is great when you’re out somewhere in nature and want to avoid getting water, mud, dirt, etc. on your shirt.
10. Reflector
Most people start shooting portraits in natural sunlight, but you’ll learn pretty soon that shooting like this can be limiting and you’ll want to add some gear to help you control the light.
Before you go spending money on flash equipment, start out with a simple reflector like this one. Using this outdoors in the sun will help you balance out the light and soften any harsh shadows on your subject.
It’s an inexpensive but incredibly useful piece of gear.
11. Flash
After a little practice with the reflector, you may decide it’s time to add some flash equipment. Buying flash gear is similar to buying a camera because you have to consider the system you are buying into. If you get more serious about flash photography then you’ll want multiple remote flashes to help you have total control over the light on your subject.
Start with one flash and one remote to connect to your camera. Using a flash on the hot shoe of your camera can be useful if you are shooting indoors and moving around a lot, like at a party. But it is quite limiting if you want to shoot posed portraits.
Getting a remote trigger so that you can use your flash off-camera will make a massive difference in the quality of your portraits.
If you want a more detailed dive into flash gear, I created this guide on the best off-camera flash gear. I break down all the gear you need from beginner to creating a portrait studio setup.
If you are just getting started, I recommend this flash and trigger from Godox to get you started.
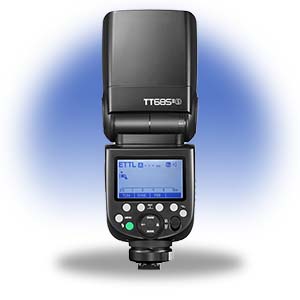
Godox | TT685 II
The Godox TT685 II is reasonably priced and great for someone getting started with flash photography. It is compatible with the Godox X remote system which means that it can be used side by side with even their top mono-lights.
Keep in mind when buying any flash gear that attaches to the hot shoe of your camera (like this flash and trigger) that you’ll need to purchase the version that matches your camera brand. They are designated by a single letter (C, N, S, F, O, or P) which refer to the following brands:
- C = Canon
- N = Nikon
- S = Sony
- F = Fuji
- O = Olympus
- P = Panasonic
Choosing the right brand will make sure all the features of the flash work properly.
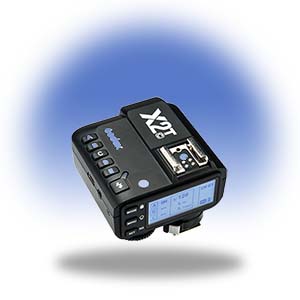
Godox | X2T
The X2T trigger is an affordable trigger that works with all of the Godox X system flashes.
Godox makes great gear at a reasonable price and just about all of their current models can work together off of the same trigger. So as you build your flash kit, you’ll be able to mix and match flashes without worrying about compatibility.
12. Lens Wipes
Keeping your camera and lenses clean is essential to making sure they last a long time. Almost every time I shoot outdoors, I will at least wipe down my camera and lenses. If I am shooting somewhere with moisture in the air, like at the beach, I’ll be even more thorough in my cleaning.
Disposable lens wipes like these are invaluable. I buy a large box about once a year and use them to clean everything from lenses, camera bodies, flash gear, and even my sunglasses. Just don’t use them to clean your camera sensor.
13. Microfiber Cloth
You can’t have enough microfiber cloths like these.
You can use them to brush the dust off your camera in windy conditions or keep lenses dry in rainy weather. They’re safe for lenses so you don’t have to worry about scratches. However, I would save the heavier lens cleaning for the lens wipes above.
14. Dust Blower
A decent dust blower like this rocket blower is great at getting loose dust of your camera and lens without having to touch it and risk smudges or streaks.
A blower is also the first thing you want to try if you have dust on your sensor. Whatever you do, DON’T use those canned air blowers that are for cleaning computers. They can do some serious damage to your camera sensor.
15. Editing Software | Lightroom and Photoshop
Photo editing (or post-processing) is an essential part of digital photography.
There are a few different options you can go with here but the industry standard is the Adobe Photo Package which includes Lightroom and Photoshop. This is where you should start if you want to learn photo editing. There’s very little you can’t do with these two programs and there is a ton of online content about them both.
Adobe Lightroom & Photoshop
The Photography Plan from Adobe is really all you need for any kind of photo editing. It’s also one of the most affordable options out there at $9.99/month.
You can get both for $9.99/month which is a pretty good deal considering everything you can do with just those two programs.
16. Software Add-Ons
There really any add-ons you’ll need, but the one set of add-ons that I’ve been using over the past year is the Topaz software. They have three separate programs for sharpening, noise reduction, and enlarging images that are pretty impressive.
I’ve used the sharpening one quite often. It’s not the normal kind of sharpening that you can accomplish in Lightroom or Photoshop. It can actually take an image where you missed focus a little bit and sharpen it up. It does this better than any other software I’ve tried.
17. Photo Editing Computer
A reliable and fast computer is necessary to run almost any photo editing software. There are hundreds of models that work well and you can even build your own custom computer using component parts (that’s what I did).
So rather than pick a random computer model, I’ll cover some of the things you need to look for when buying one.
Important Specs
There are three computer specs that have the biggest effect on the speed at which you can edit photos:
- Processor Speed
- Hard Drive Speed
- Graphics Processor RAM and Speed
As for CPUs and GPUs, the faster the better but speed costs money. The processor is more important than the GPU for photo editing but the GPU is important if you want to edit some videos also.
Hard drive speed is critical. Having an SSD hard drive makes a massive difference compared to a regular HDD. If you are looking for one thing to upgrade to speed up your computer, start off by making sure you are using an SSD for storing your photos and Lightroom catalog (if you’re using Lightroom).
5 Things You Really Don’t Need…
Top Of The Line Camera
Especially if you are just getting started with photography, the flagship models for each of the camera brands are overkill for 95% of you out there. They are designed for professional photographers that are being paid to do things like shoot professional sports and need features like 20 frames per second.
Most of us will never need more than the middle-of-the-road full-frame models. In fact, I built a successful photography business using a Nikon D5100, a mid-range crop sensor camera.
So before you go spending $5000+ on a camera body, think again and go for a nice lens instead.
Camera Store Bundles
Camera stores love to upsell you on trash you’ll never use. They always have a bundle available for “just a little more money” that includes a tripod that will break the second time you use it, a camera bag that won’t fit half the things you need, and a microfiber cloth (ok that last one is useful…I always lose those).
Skip the bundle. You’d get a better value for your money if you played the lottery.
UV Filter
UV Filters are good for one situation. When you are shooting in harsh elements like a sandstorm or driving rain and you want to keep your front element protected. Other than that very specific situation, they are completely useless.
Color Checker
These are useful for video but if you’re shooting RAW and can adjust white balance after the fact, they aren’t helpful at all. Skip the color checker.
Light Meters
A lot of professional photographers still use these with flash, but I think it’s an extra unnecessary step. With digital cameras, you can simply take a shot and see how it looks in order to adjust the flash.
Using a light meter is complicated, takes time, and you still end up adjusting the light after you take a test shot. So skip the meter and go straight to taking test shots.